Posts Tagged ‘diy’

An Inexpensive Cane Scoring Tool

Scor­ing is the process of cut­ting a num­ber of par­al­lel ver­ti­cal lines in the bark a piece of gouged, shaped, and pro­filed cane. These cuts make it eas­i­er to form the cane into a cylin­dri­cal tube and help pre­vent crack­ing dur­ing the form­ing process. Dif­fer­ent reed mak­ers have var­i­ous the­o­ries of scor­ing, involv­ing dif­fer­ent num­bers, spac­ing, length, and depth of score marks. There is also quite a vari­ety of tools one can choose from to actu­al­ly per­form the scor­ing, rang­ing from a $4 util­i­ty knife to Rieger’s €946 scor­ing machine. The tool I have used for years is close to the inex­pen­sive end of this spec­trum. It is sim­ply a tap (a tool for cut­ting screw threads) mount­ed in a file handle.

Parts and Assembly

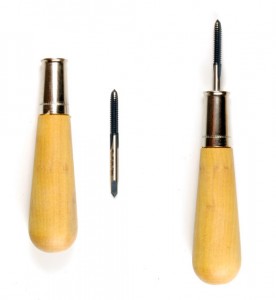
Left: file han­dle and tap. Right: assem­bled scor­ing tool.

I cer­tain­ly can’t claim to have invent­ed this — I saw Pro­fes­sor James Lotz at Ten­nessee Tech Uni­ver­si­ty demon­strate such a tool when I was a bud­ding reed mak­er in high school. Miller Mar­ket­ing also sells a scor­ing tool that looks to be basi­cal­ly the same thing, made by 2XReed. I don’t remem­ber what the orig­i­nal tap and han­dle cost (I’ve been using the same scor­ing tool for about 15 years). But I recent­ly made a sec­ond one to keep in my office, and the parts came to a whop­ping $8. Here are a tap and han­dle sim­i­lar to the ones that I recent­ly pur­chased. If you’re lucky, the tap will just fit snug­ly in the han­dle — my first tool went togeth­er that way with a sim­ple fric­tion fit. If you’re unlucky (as I was with my recent parts), you’ll have to glue the tap into the han­dle to keep it in place. No big deal. There are prob­a­bly high­er qual­i­ty file han­dles out there with more con­sis­tent con­struc­tion, but this is what my local hard­ware store had.

Tap Close-up

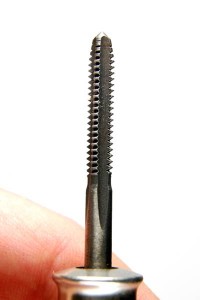
Detail of the tap

The spe­cif­ic size of the tap isn’t crit­i­cal — you just need some­thing with cut­ting teeth (close up at right) with the spac­ing you want to achieve in your scor­ing lines. I use a tap for cut­ting 10–24 threads; the 2XReed tap looks big­ger. If you actu­al­ly buy your tap at a hard­ware store rather than online, you can just looks at all the dif­fer­ent choic­es and pick one that looks right to you.

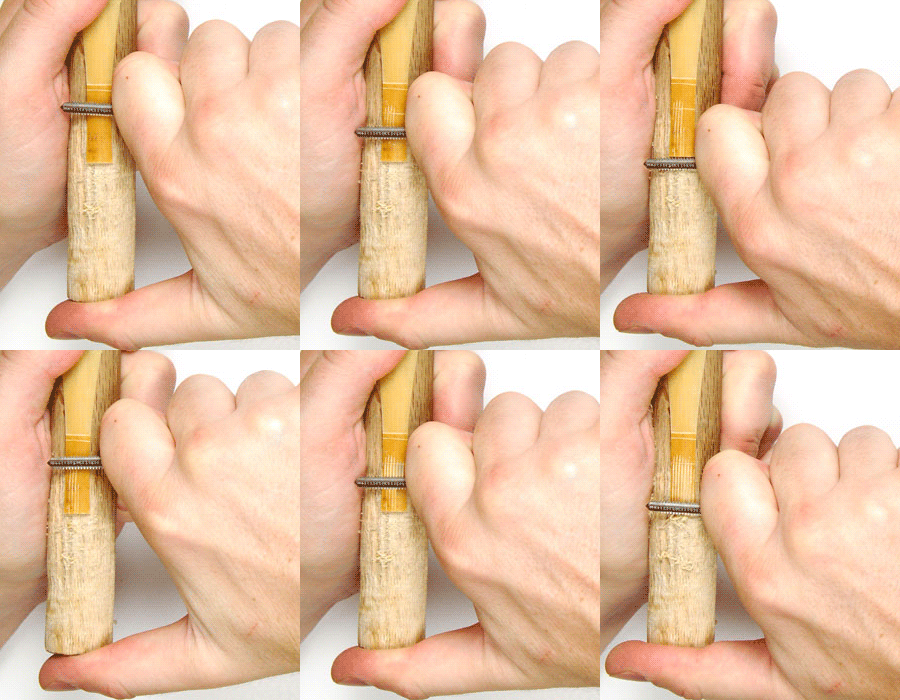
To use the tool, first put your piece of cane on an easel. Then, hold the tool per­pen­dic­u­lar to the cane at the point you want to start your score lines — I like to start just above the sec­ond wire. Make sure that you have the edge of one set of cut­ting teeth lined up to dig into the cane, apply a bit of pres­sure, and draw the tool straight down your cane. I like to plant my thumb on the back end of the easel and use a sort of clos­ing-the-hand motion to help keep my lines straight. One pass with the tool with score about half the width of the cane. To score the oth­er side, just repeat the action on the oth­er side. You can put one tooth of the scor­ing tool the last exist­ing line to keep the prop­er spac­ing and direc­tion of your score marks. I’ve thrown togeth­er a quick ani­ma­tion of the scor­ing process:

Scoring Animation

Click to see an ani­ma­tion of the scor­ing process

Finished Cane

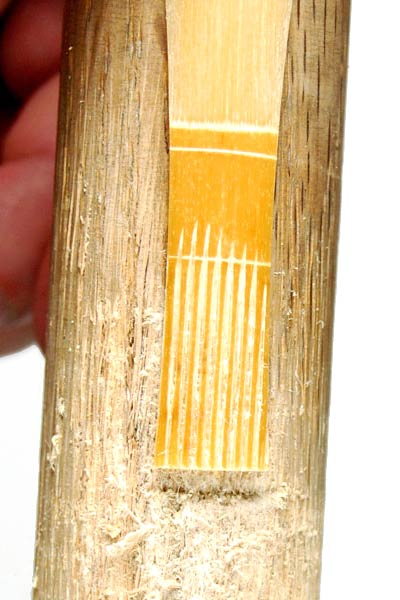
Cane after a cou­ple of pass­es with the tool

And there you have it: eight or nine per­fect­ly par­al­lel score marks in a mat­ter of a few sec­onds. Above right you can see a piece of cane after a cou­ple of pass­es with the scor­ing tool. I went a lit­tle too high on the left side of this piece of cane, but it’s not a big deal. It does take a lit­tle prac­tice to align the cut­ting teeth prop­er­ly, and also to make the first cut per­fect­ly straight. But get­ting the hang of it does­n’t take very long, and pret­ty quick­ly you’ll be get­ting very con­sis­tent results. The one draw­back of this method is that it does­n’t quite cut as deeply as I’d like; I like my scor­ing to go all the way through the cane at the back end. So, I typ­i­cal­ly deep­en the marks with a util­i­ty knife — anoth­er pret­ty quick operation.

The $3 Bassoon Reed Case

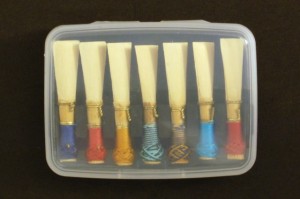
Case With Reeds

The $3 Reed Case

I have a num­ber of nice reed cas­es: a leather-cov­ered three-reed case that came with my bas­soon, a nine-reed wood­en case by Wise­man, and a cou­ple of beau­ti­ful maple cas­es by Roger Gar­rett. But I always seem to need more lit­tle box­es for trans­port­ing reeds for stu­dents, stash­ing French or peri­od bas­soon reeds, or just to hold over­flow from my oth­er cas­es. My go-to for this sort of thing is the tried-and-true Altoids tin. But Altoids tins are just slight­ly the wrong dimen­sions to be a tru­ly space-effi­cient reed case, and as a result I’ve always got my eye out for oth­er lit­tle tins or box­es. Ver­mints tins are a marked improve­ment (they’re a bit wider and shal­low­er than Altoids tins). But I recent­ly stum­bled across some lit­tle hinged plas­tic box­es at the Con­tain­er Store that are near­ly perfect.

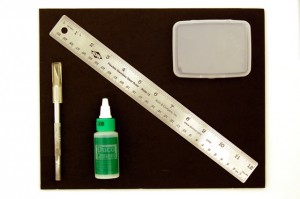
Reed Case Tools and Materials

Reed Case Tools and Materials

Best of all, they’re only $2 a pop. Add a ~$1 sheet of foam from a craft store and some tools you almost cer­tain­ly already have lying around, and you’ve got a sev­en-reed case for about $3. Here’s all you’ll need to make one:

Mate­ri­als:

Tools:

  • Duco cement
  • X‑acto or util­i­ty knife
  • ruler

You can buy spe­cial­ly-made strips of reed foam from Reeds ‘n Stuff. I’ve used them, and they work well. But the foam hold­ers in my Wise­man case hold reeds in a more com­pact fash­ion, so I decid­ed to basi­cal­ly copy that design for this case. The Wise­man foam isn’t a pur­pose-made strip but is actu­al­ly made up of mul­ti­ple lit­tle pieces glued togeth­er: tall pieces to go between reeds, short pieces to go under them, and long strips at the top and bot­tom to hold it all togeth­er. Using that method I can fit sev­en reeds in this 94mm-wide plas­tic case; the Reeds ‘n Stuff strip would only fit five in the same space.

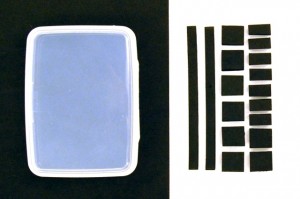
Foam Pieces

Emp­ty Box and Foam Pieces

The first step is to cut lit­tle pieces out of the foam sheet. The pre­cise dimen­sions will depend on the thick­ness of your foam — mine is 5mm thick. I decid­ed to make the top and bot­tom strips 6mm wide and the entire cen­ter assem­bly 15mm wide. The cen­ter assem­bly is made up of eight 12mm x 15mm blocks (placed ver­ti­cal­ly) and sev­en 7mm x 15mm blocks (placed hor­i­zon­tal­ly). I neglect­ed to get a good pic­ture of the foam assem­bly itself, but you should be able to fig­ure out how it’s put togeth­er from the fin­ished case pictures.

After I cut out all the foam bits, I did a dry fit in the plas­tic box. I had­n’t account­ed for the box’s beveled edges, so I had to trim a bit of foam off the cor­ners of the end pieces. After a lit­tle tri­al and error, I had every­thing fit­ting snug­ly. I made sure the foam assem­bly was squared up to the edges of the box, and then I used my knife to light­ly score the box’s bot­tom to mark the foam’s posi­tion. I removed the foam, and then used some sand­pa­per to rough up the plas­tic where the foam would be glued in. The box’s sur­face is very smooth, so rough­ing it up a bit pro­vides the glue with a bet­ter sur­face to which to adhere.

Then, it’s just a mat­ter of apply­ing glue to the box and to the appro­pri­ate areas of each piece of foam (where they’ll con­tact the box or oth­er foam), and assem­bling it all. I put in the upper nar­row strip first, then built the cen­ter assem­bly from left to right, then applied the bot­tom nar­row strip to square it all up. I cut some more bits of foam in basi­cal­ly a reverse pat­tern so that clos­ing the case clamped it all togeth­er while the glue dried. I picked Duco because that’s some­thing we bas­soon­ists tend to have lying around, but cyano­acry­late (super glue) may actu­al­ly be a bet­ter choice for this sort of plas­tic. Time will tell if I need to re-glue anything.

Since I’m plan­ning to use this as an aux­il­iary reed case, I did­n’t both­er punch­ing any holes in it. But if you plan to use one of these on a day-to-day basis and antic­i­pate putting your reeds away wet, you should pro­vide it with some form of ven­ti­la­tion. I bet a sol­der­ing iron could melt nice lit­tle air holes in this plas­tic — don’t breathe in the fumes, though.

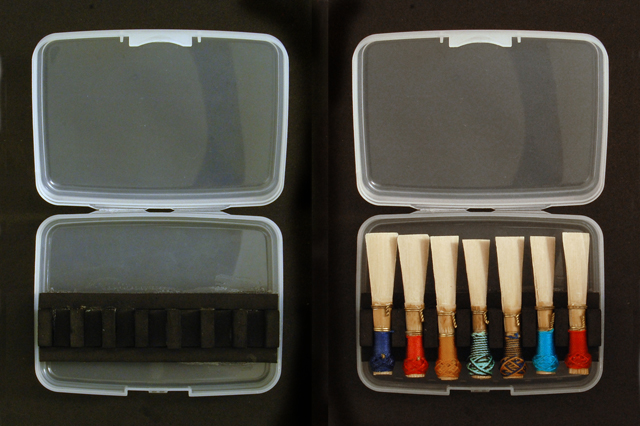
Two Views of the Finished Case

Two Views of the Fin­ished Case

One note about using this case: the reeds are so close togeth­er that you have to tilt them slight­ly to fit them all in (you can see the tilt­ing and over­lap in the pho­to above). I’ve done this for years with my Wise­man case, but it might seem a lit­tle strange if you’ve nev­er done it before. There’s plen­ty of ver­ti­cal clear­ance on both sides for the reeds to sit safe­ly this way, and if you treat both reeds and case with the prop­er care, this con­fig­u­ra­tion should­n’t cause any problems.

Community Chest

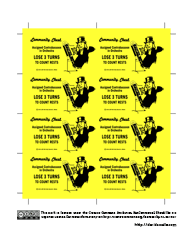
Community Chest Card - Assigned Contrabassoon In Orchestra; Lose 3 Turns to Count Rests

I cre­at­ed this faux Monop­oly card when I was in grad school at Flori­da State. I actu­al­ly print­ed a few of them and hand­ed them to friends who got stuck with con­tra­bas­soon duty in orches­tra. I post­ed it on an old blog a few years ago, and it seems to have spread quite a bit since then! I see it pop­ping up on Face­book every once in a while, post­ed by a dif­fer­ent bas­soon­ist each time. See­ing it get passed around the ‘net is great, but it would be even more fun if oth­er peo­ple were hand­ing them out in the real world.

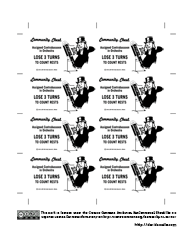
In the inter­est of mak­ing it easy for peo­ple to turn this dig­i­tal image into real-life cards, I’ve made up a print­able PDF. There are 8 cards per page, com­plete with handy crop marks to aid in cut­ting them to size. I’ve actu­al­ly made two PDFs: one with a yel­low back­ground for the cards, for print­ing on white paper, and one with no back­ground, in case you’d like to actu­al­ly print on yel­low paper. For best results, I’d rec­om­mend find­ing some yel­low card stock at your local office sup­ply store and using the uncol­ored PDF. How­ev­er you decide to print it, be sure to tell your PDF read­er to print at full size, rather than shrink­ing to fit. The mar­gins are gen­er­ous, and print­ing full size will ensure that your cards are the prop­er dimensions. 

Creative Commons License I want to make it clear that this is a par­o­dy and that I’m not inter­est­ed in mak­ing any mon­ey from it. (Hi Has­bro!) So, I’m releas­ing this under a Cre­ative Com­mons Attri­bu­tion-Non­Com­mer­cial-Share­Alike 3.0 Unport­ed License (just like my fin­ger­ing charts). Basi­cal­ly, it means that you’re free to use, dis­trib­ute, or remix this how­ev­er you’d like, as long as you cred­it me, don’t use it to make mon­ey, and use the same license for any deriv­a­tive works.

Quick Instructions:

  1. Obtain some card stock, either in white or yel­low — the thick­er, the better.
  2. Down­load whichev­er PDF match­es your paper — col­ored for plain paper or plain for col­ored paper.
  3. Open in your favorite PDF read­er and print — be sure that you print at full size.
  4. Use an X‑Acto knife, a stur­dy ruler, and a suit­able cut­ting sur­face to trim the cards (using the pro­vid­ed crop marks). A ded­i­cat­ed paper cut­ter will work, too.
  5. Dis­trib­ute to your friends (or enemies).
Community Contra Card Sheet (yellow)

Print­able Sheet with Yel­low Background

Community Contra Card Sheet

Plain Print­able Sheet (for Yel­low Paper)

Fingering Charts

Update (6/25/2014): Find the lat­est ver­sion of my fin­ger­ing charts here: https://davidawells.com/resources/fingering-charts/

E-flat fingering

My favorite fin­ger­ing. No, really…

A cou­ple of weeks ago, I start­ed teach­ing a high school vio­list who decid­ed that she’d like to play the bas­soon. Not know­ing if she’d got­ten her hands on a fin­ger­ing chart or not, I decid­ed to take one to her les­son. I have quite a few charts lying around, but as I looked through them, I real­ized that I did­n’t com­plete­ly agree with any of them, at least not for use by a begin­ning stu­dent. I end­ed up tak­ing her a copy of a chart that I’d got­ten from the Conn-Selmer web site, but only after I’d marked it all up with a pen. It turned out that she did have a fin­ger­ing chart already, but I did­n’t com­plete­ly agree with it, either. As I was dri­ving home from her first les­son, I thought to myself how sil­ly it is to give a stu­dent a fin­ger­ing chart that I’ve marked all over, espe­cial­ly since this cer­tain­ly isn’t the first time I’ve done so. I resolved then and there that I’d make my own fin­ger­ing chart.

Awhile ago, I’d come across the very cool and well-thought-out Fin­ger­ing Dia­gram Builder built by Bret Pimentel, mul­ti­ple-wood­winds teacher at Delta State Uni­ver­si­ty. (You can read more about the FDB here). But until now, I had­n’t done any more than just play around with it. I used Bret’s FDB to crank out an image for each of my basic fin­ger­ings. I includ­ed my most com­mon alter­nate fin­ger­ings, but did­n’t get into slur, mut­ed, trill, or oth­er variations.

Once I had all of the images, I had to decide how best to lay them out with­in a score. I’ve been using Finale for years, but I’d recent­ly start­ed play­ing around with Lily­Pond. Lily­Pond is an open-source music engrav­ing pro­gram that pro­duces very nice-look­ing scores — far clos­er in appear­ance to good old-fash­ioned hand engrav­ing than Finale’s often jagged and weird­ly-spaced out­put. The down­side (if you choose to see it that way) is that Lily­Pond has no graph­i­cal user inter­face; it gen­er­ates scores from spe­cial­ly for­mat­ted text files, and is in that way more like a pro­gram­ming lan­guage than a tra­di­tion­al nota­tion pro­gram. But, I’d been look­ing for a project to under­take with Lily­Pond, and this seemed like just the thing.

It took awhile to get the hang of Lily­Pond, and some for­mat­ting things I only ever got by tri­al and error. But, I final­ly end­ed up with two ver­sions of my per­son­al fin­ger­ing chart. The first is the one I’ll hand stu­dents. It cov­ers the more-or-less stan­dard range of the bas­soon (Bb1 — E5), uses only bass and tenor clefs, and includes a dia­gram with key names. The sec­ond, which I’ve dubbed my “Pro” chart, dis­cards the key dia­gram and switch­es to tre­ble clef at the top end. Oh, it also goes up to Bb5 (although I don’t yet have a reli­able fin­ger­ing for A5 — anybody?).

Since Bret has made the dia­grams gen­er­at­ed by his FDB avail­able under a Cre­ative Com­mons Attri­bu­tion-Non­Com­mer­cial-Share­Alike 3.0 Unport­ed (CC BY-NC-SA 3.0) license, I’ve done the same with my charts. Please, take a look and let me know what you think. Is there any­thing I could do to make them eas­i­er to read, eas­i­er to use, or just plain look nicer? Or do you spot any fin­ger­ings that I’ve ren­dered incorrectly?

Hot Rod Bassoon Strap

When­ev­er pos­si­ble, I pre­fer stand­ing up to play. I do this for solo works, small cham­ber pieces, and I’ve even helped con­vinced a wood­wind quin­tet to stand to per­form. Stand­ing gives me more free­dom of move­ment, which I feel allows for more musi­cal free­dom, as well. This free­dom of move­ment also makes it eas­i­er to com­mu­ni­cate with my fel­low per­form­ers, whether through eye con­tact or phys­i­cal ges­ture. Of course, he bas­soon also tends to project bet­ter when played stand­ing up, and a stand­ing play­er is gen­er­al­ly just more inter­est­ing for the audi­ence to watch.

To facil­i­tate stand­ing it’s impor­tant to find a strap that’s com­fort­able, along with any acces­sories that make stand­ing eas­i­er (I use a bal­ance hang­er and a right-hand crutch). There are many options for straps out there, but they most­ly fall into three cat­e­gories: neck straps, har­ness­es, and slings. I’ve tried all three. I find that neck straps put too much weight on the neck and don’t put the bas­soon in a good play­ing posi­tion. Dou­ble-shoul­der har­ness­es dis­trib­ute weight bet­ter, but are hard­er to get in and out of and can be visu­al­ly dis­tract­ing. I have, since some time in my under­grad­u­ate years, used a sin­gle-shoul­der sling.

My usu­al sling is a black one made by BG that has a thick shoul­der pad. I wear it over my right shoul­der, which is the oppo­site of what many peo­ple do. The sling does put pres­sure and weight on my right shoul­der but I feel that it’s much more even­ly dis­trib­uted than with a neck strap. The sling also allows my bas­soon to hang in a com­fort­able play­ing position.

When I played Dead Elvis last month, I did­n’t want to wear my black sling over my white Elvis jump­suit. Luck­i­ly, I had a white BG dou­ble shoul­der har­ness that I won as a door prize from Mid­west Musi­cal Imports at a dou­ble reed event a few years ago. I dis­as­sem­bled the har­ness into two pieces, one of which was basi­cal­ly a sling with­out a strap pad. It worked very well, and that got me think­ing about mak­ing anoth­er strap from scratch.

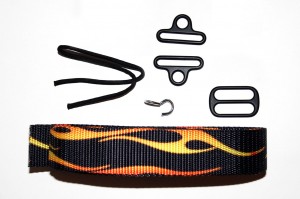
Strap Parts

Poly­ester web­bing, para­cord, mod­i­fied s‑hook, reduc­ing rings, and strap adjuster.

Rather than just go for anoth­er sol­id col­or, I found some inch-and-a-half wide poly­ester web­bing embla­zoned with hot rod flames. Along with the web­bing, I ordered a whole array of slides, adjusters, rings, and oth­er strap hard­ware. I went through quite a few iter­a­tions before set­tling on a final design. My final strap uses the items at right — it’s a fair­ly sim­ple construction.

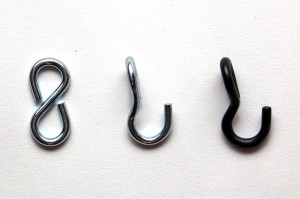
The actu­al method of attach­ment to the bas­soon proved to be the most dif­fi­cult aspect. My BG sling uses a small rub­ber-coat­ed s‑hook, closed at one end, with a 90° twist in the mid­dle. I searched all over, online and off, but could­n’t find any hooks the prop­er size and shape. In fact, I could­n’t find any hooks with a 90° twist at all. I tried a num­ber of alter­na­tives, includ­ing var­i­ous clips, snaps, quick links, rings, and swivels, but none were suf­fi­cient for my pur­pos­es. I end­ed up tak­ing a stan­dard closed s‑hook, bend­ing it to my required shape, then coat­ing it in Plas­ti-Dip.

S-Hooks

L to R: Unmod­i­fied S‑hook, hook with 90° twist, twist­ed hook with rub­ber coating

The fin­ished hook is sim­ply thread­ed onto a triple strand of para­cord, which I used to tie the two ends of the strap togeth­er. The strap itself con­sists of a lit­tle less than four feet of web­bing, one strap adjuster, and two web­bing-to-cord reduc­ing rings. I decid­ed to for­go a strap pad, and am hop­ing that the wider web­bing will suf­fi­cient­ly dis­trib­ute the weight. The hard­ware (oth­er than the hook) is met­al and pow­der-coat­ed in black, which looks pret­ty slick. I don’t own a sewing machine, so I had my neigh­bor­hood shoe/luggage repair per­son sew the strap togeth­er. My total costs for the fin­ished strap were about $12 or $13 in parts and sewing. Of course, I spent quite a bit of time on it. But now that I’ve set­tled on a design, the next one (should there be a next one) will go sig­nif­i­cant­ly faster.

And the final product:

Strap with Bassoon