
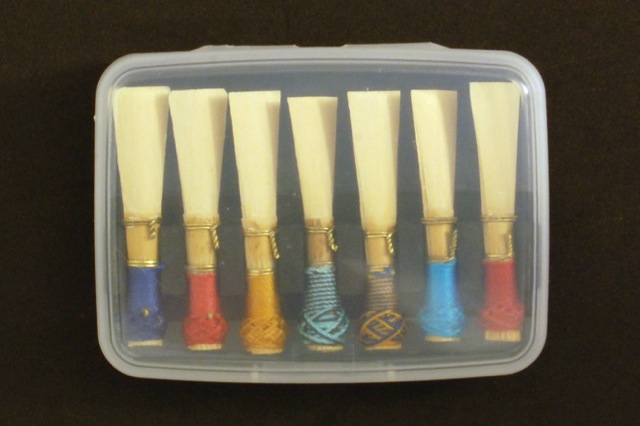
The $3 Reed Case
I have a number of nice reed cases: a leather-covered three-reed case that came with my bassoon, a nine-reed wooden case by Wiseman, and a couple of beautiful maple cases by Roger Garrett. But I always seem to need more little boxes for transporting reeds for students, stashing French or period bassoon reeds, or just to hold overflow from my other cases. My go-to for this sort of thing is the tried-and-true Altoids tin. But Altoids tins are just slightly the wrong dimensions to be a truly space-efficient reed case, and as a result I’ve always got my eye out for other little tins or boxes. Vermints tins are a marked improvement (they’re a bit wider and shallower than Altoids tins). But I recently stumbled across some little hinged plastic boxes at the Container Store that are nearly perfect.
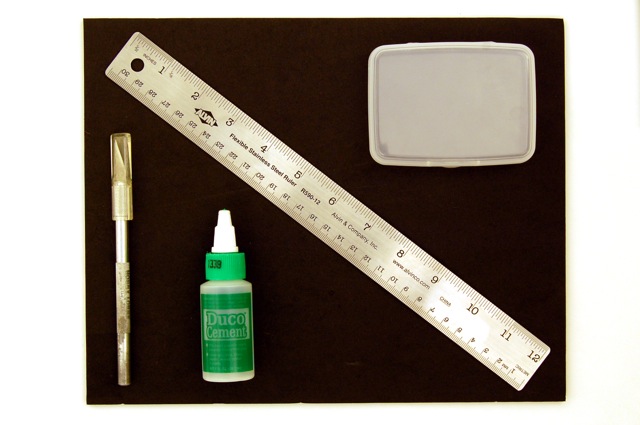
Reed Case Tools and Materials
Best of all, they’re only $2 a pop. Add a ~$1 sheet of foam from a craft store and some tools you almost certainly already have lying around, and you’ve got a seven-reed case for about $3. Here’s all you’ll need to make one:
Materials:
- black foam sheet (5–6mm thick)
- medium hinged box
Tools:
- Duco cement
- X‑acto or utility knife
- ruler
You can buy specially-made strips of reed foam from Reeds ‘n Stuff. I’ve used them, and they work well. But the foam holders in my Wiseman case hold reeds in a more compact fashion, so I decided to basically copy that design for this case. The Wiseman foam isn’t a purpose-made strip but is actually made up of multiple little pieces glued together: tall pieces to go between reeds, short pieces to go under them, and long strips at the top and bottom to hold it all together. Using that method I can fit seven reeds in this 94mm-wide plastic case; the Reeds ‘n Stuff strip would only fit five in the same space.
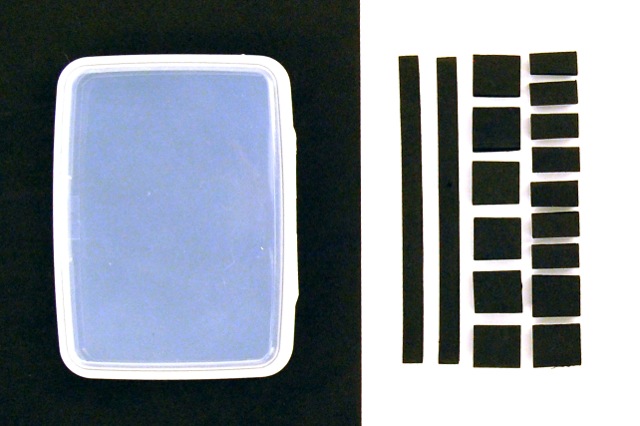
Empty Box and Foam Pieces
The first step is to cut little pieces out of the foam sheet. The precise dimensions will depend on the thickness of your foam — mine is 5mm thick. I decided to make the top and bottom strips 6mm wide and the entire center assembly 15mm wide. The center assembly is made up of eight 12mm x 15mm blocks (placed vertically) and seven 7mm x 15mm blocks (placed horizontally). I neglected to get a good picture of the foam assembly itself, but you should be able to figure out how it’s put together from the finished case pictures.
After I cut out all the foam bits, I did a dry fit in the plastic box. I hadn’t accounted for the box’s beveled edges, so I had to trim a bit of foam off the corners of the end pieces. After a little trial and error, I had everything fitting snugly. I made sure the foam assembly was squared up to the edges of the box, and then I used my knife to lightly score the box’s bottom to mark the foam’s position. I removed the foam, and then used some sandpaper to rough up the plastic where the foam would be glued in. The box’s surface is very smooth, so roughing it up a bit provides the glue with a better surface to which to adhere.
Then, it’s just a matter of applying glue to the box and to the appropriate areas of each piece of foam (where they’ll contact the box or other foam), and assembling it all. I put in the upper narrow strip first, then built the center assembly from left to right, then applied the bottom narrow strip to square it all up. I cut some more bits of foam in basically a reverse pattern so that closing the case clamped it all together while the glue dried. I picked Duco because that’s something we bassoonists tend to have lying around, but cyanoacrylate (super glue) may actually be a better choice for this sort of plastic. Time will tell if I need to re-glue anything.
Since I’m planning to use this as an auxiliary reed case, I didn’t bother punching any holes in it. But if you plan to use one of these on a day-to-day basis and anticipate putting your reeds away wet, you should provide it with some form of ventilation. I bet a soldering iron could melt nice little air holes in this plastic — don’t breathe in the fumes, though.
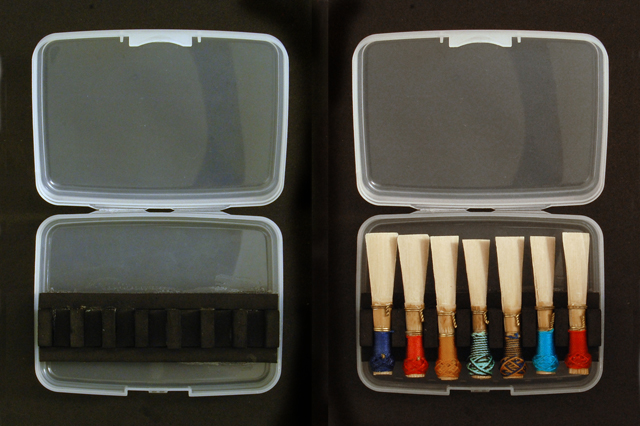
Two Views of the Finished Case
One note about using this case: the reeds are so close together that you have to tilt them slightly to fit them all in (you can see the tilting and overlap in the photo above). I’ve done this for years with my Wiseman case, but it might seem a little strange if you’ve never done it before. There’s plenty of vertical clearance on both sides for the reeds to sit safely this way, and if you treat both reeds and case with the proper care, this configuration shouldn’t cause any problems.
Trent
April 17th, 2013
I would say don’t ruin your soldering iron by melting holes. A dremel drill with a bit will do the job of providing ventilation without the mess, without the smell, and the final look will be better.
David A. Wells
April 17th, 2013
Would it really do damage to the iron? Mine is so cheaply constructed and beaten up that I’m not too worried about it. I hadn’t thought about drilling with a Dremel. I’ve had bad results drilling thin plastic with a standard power drill in the past, but I suppose the additional RPMs of a Dremel would do a better job.
Erica
April 30th, 2013
You won’t ruin the iron itself but the tip won’t be the same after that. Nice case, by the way. I’ve been thinking of making a similar one and might check out the Container Store now.
Daniel Beilman
September 2nd, 2013
To drill holes I always use one of my really old reamers. I use a 2XReed reamer that has a pretty sharp point. I use it to make holes in wood, plastic and metal for students and myself. With the metal, use a diamond sanding block to smooth the edges.
Great site, by the way!
David A. Wells
September 2nd, 2013
Thanks! I’ve just gotten some more of these plastic cases, and I think I’ll sacrifice one to test different hole punching/drilling methods. Unfortunately the only old reamer I’ve got is one of the Foxes with a single straight cutting edge. It doesn’t cut cane very well, and I doubt it would do any better on plastic.
Barbara Warren
February 3rd, 2014
Hi David
I enjoyed reading your website.
Do you actually sell one of those reed cases? I just don’t have the time to make one, but I really need at least one; perhaps more.
Thank you so much.
Barbara
David A. Wells
February 3rd, 2014
Hi Barbara,
No, I don’t have the time to make these on any sort of scale, unfortunately. A faster method would be to buy some pre-made reed holder foam from Forrests: http://www.forrestsmusic.com/bassoon_reed_cases.htm#RT_U-49. For $29 you get one meter’s worth. You can then cut that into whatever width you want and quickly glue it into boxes of all sorts. I used some of this for a big reed blank storage box that holds 33 reeds. It’s good stuff, just slightly more expensive and not quite as compact as the method I describe here.
Taylor
September 21st, 2014
To make this project go faster, you can buy precut foam from Forrests.
Ribbon Type Holding Strip: http://www.forrestsmusic.com/bassoon_reed_cases.htm
I also used double sided foam tape instead of glue so it’s usable instantly!
I think I made about 8 of these rather quickly. The slowest part was drilling holes with my off-brand Dremel tool.